Sunday, February 27, 2022

Bonus: Grey Knight WIP

Before I can finish up the Techmarine and Apothecary, I need drive out to visit my dad to use the Foredom to drill out the holes to pin them together (not going to repeat drilling into pewter again if I don't have to!)

So, in the meantime, I've had this sitting on the desk and I figured I'd try out a few new techniques!

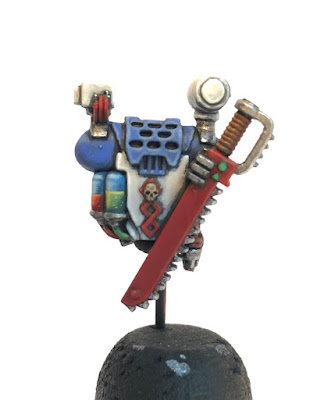
First was to use a stippling technique with a blunt Artis Opus dry brush that I saw in a video about 'grim dark' Ultramarine paint styles by Richard Gray.  I applied it here to give a texture to the bronze base coat.  In general I was following a scheme from a "Vertisee Models" video for a weathered Grey Knight.

I found I had to use a wash of Snake Bite Leather Contrast over the bronze to get the real dark effect I was looking for, then a dry brush of Leadbelcher and then silver highlights for the edges and scratches.  Overall it achieved the effect I wanted - armor that looked ancient - like a very weathered coin.

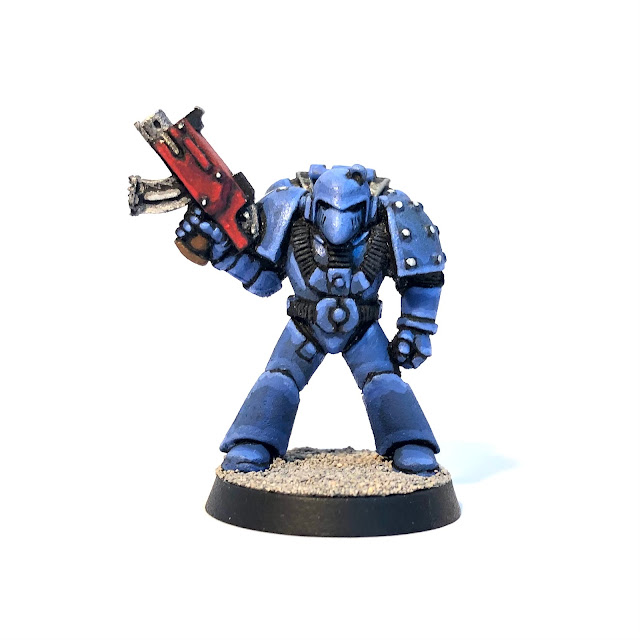
I will say that I can see why people go for NMM (non-metal metallics) because working with metallic paint isn't great.  Namely, its hard to get it to look really crisp with sharp lines.  I feel like in the pictures exaggerate the problem though because in person it does look a bit better.

For the Nemesis Force Sword, I found a lot of videos to work magic with air brushes - but not really useful for me.  I found Juan Hidalgo's video and it was what I was going for.  This is the second time I had used one of his videos, I followed his technique for the plasma pistol OSL as well.  It was very approachable and turned out pretty well!

I didn't have any of the colors he used, so I substituted in Vallejo Deep Sky Blue for the base, then a mix of Deep Sky Blue + Skarsnik Green + White glazes in various concentrations for the shine, and blue ink for the shade in the other direction.  Then the black and white per his video.  It really worked out - this was the first try, so imagine after some practice!

Anyway, the whole thing so far came together in just 9 hours of paint time which is about 3/4ths as much time as I spent recently on the other models (per model).

Really all that is left is the base and then some varnish.  This prototype scheme will probably be what I use for the rest of my Rogue Trader era Grey Knight 5 man squad, though I might get the remaining colors for the sword so that I don't have to mix them (hopefully it is close enough).


Monday, February 21, 2022

Appy 'n Teckie (WIP) Update 4

All of the detail is done!  And I've applied a base coat of brush on varnish.  I think I will do that from now on (at least for important models) to add extra protection.  I've read that Testors Dullcoat spray doesn't protect very well.  I'll still use it for the finish, but I think the extra varnish under might be a good idea.

I still need to pin the backpacks on, finish the bases, and spray on the dullcoat.  And then also apply the final metallic highlights.


I finished the liquid vials on the backpack - the last step was to apply the blue colors for the upper part of the glass.  I think overall it was a success.


I just found some old references to post heresy Ultramarine Chief Apothecary and Master of the Forge names in an old White Dwarf (WD97).  Guess who now has names?


While I like using my own names for my models, and would never use 'Named' Character datasheets (well maybe someday I might get a Robby G...) but I will use a 'known' name that isn't attached to a datasheet, especially if its a really obscure and retro reference!  

But some of those names though, oh man, Christopher Columbus (basically) - right up there with Inquisitor Obiwan Sherlock Clousseau ;)

Friday, February 11, 2022

Appy 'n Teckie (WIP) Update 3

 Making more progress, and I've also been learning some new things!

First, I found a glazing tutorial by Dana Howl (aka @dana_howl) were I learned something useful that I hadn't heard before.  The main new thing was to wet a towel and unload 'most' of the glaze/paint from the brush before going in to paint.  'Most' still takes practice and experience, but the goal is to prevent flooding the area on the miniature.  This small bit of information which I had never heard before was huge!  It was the missing piece that I didn't know I didn't know.  I had always struggled with paint pooling/ponding and then creating marks at the edges of the pool if it dried even a little as I was trying to move it around.  I always thought it was a consistency problem or something and this finally gave me the answer!

She recommended using glaze medium rather than water which I had heard before, but I tried it again, and with the above information it was helpful in differentiating more for me in my mind the difference between a wash and a glaze.

Anyway, with that, I have made progress on several areas which directly benefitted from this new information and gave really good results.  For example, the Techmarine's helm lens/visor looks really good after applying some blended glazes from green to a slight lemon lime blend with yellow.

And of course, I started in on the green liquid in the Apothecary's backpack.  I'm following Louise Sugden's (aka @Savage_ork_guy) Citadel Colour Master Class Glass Bottles technique which was a huge help and so far it's turning out great.


Friday, February 4, 2022

The Mystery of the 'Transition Marines'

 I've been trying to identify the catalogue numbers for my retro 40k collection and I've discovered that this model is hard to identify:

When I tried crowdsourcing a bit with reddit I found a reference to so called "Transition Marines".  There is a wiki page here that seems maybe abandoned which labels them as such and has images of the three Mark VIs that I have in my collection.

The thinking is that they are from around between '89-'91 or maybe as late as '93.  I would think they are towards the end of that range.  It seems they had perfected the look of the Mark VI in this miniature, particularly the shape of the helmet - finally settling on something that reminds me of a F-15 nose/cockpit.  Also the chest hoses look good and don't attach awkwardly to the underside of the helmet in a way that didn't look so good on a miniature.  Also the bolter is definitely more of the 2nd edition style with the housing that has an Aquila.

Also interestingly it seems these "Transition Marines" all seem to be full body sculpts - no plastic arms/shoulders to allow for customization of loadouts (the backpack was still plastic though).  So perhaps these represent the transition from the very early retro Rogue Trader look, to the late 1st ed/ early 2nd ed designs, but lacked the customization options?  Not sure.

I couldn't find much other information, but so far the theory is that these never appeared in catalogues.  I'd really like to know more about them, so hopefully someday someone will come along to shed some light on this mystery.

Tuesday, February 1, 2022

Appy 'n Teckie (WIP) Update 2

 More progress with Appy 'n Teckie:

I've finished all of the base coats and most of the shading.  I think the white is turning out well.  I'm using the same formula I worked out on the Assault Terminator helms but have been applying even thinner coats and it's going well.  This is Vallejo Sky Gray (it comes through pretty white due to the photo).  Most of the shading is just the Vallejo Basalt Grey underneath rather than a shade.  I brought the Sky Grey down to a glaze for the last few layers over the shoulder studs, still needs some work I think.  For the Apothecary badge on the other shoulder I got as close as I dare could with the white, but I did want to leave a bit of darker gray to outline the badge.  There were a few spots that were just too small so I used some Apothecary White Contrast paint and it worked pretty well in those areas.

I figured out that with a ton more blue tac I could get the heavy metal Techmarine backpack to sit upright on the pin.  Now its a bit easier to paint.  Its going pretty well, I opted to use Basilicanum Grey Contrast (mixed with contrast medium) to shade rather than Blood Angels Red Contrast because it gives a bit more of a grimy/oily look that a Techmarine would probably have.  I did use some Blood Angels Red to shade larger patches of armor on the under side of arms and legs though.  I also used some Ork Flesh Contrast to tint the toolbox after first highlighting it with Vallejo Silver.  It turned out pretty well actually, was exactly the look I was going for.

I'm having fun with the glass vials on the Apothecary backpack.  I'm following a masterclass guide from GW.  I didn't have many of the colors they indicated in GW paint, but luckily it seems I had most of the equivalents in Vallejo.  For the glass its a 70/30 mx of Vallejo Deep Sky Blue and Vallejo Prussian Blue.  For the green liquid its 50/50 Caliban and Vallejo Intermediate Green, and the red liquid is Khorne Red.  I've also shaded the red with Blood Angels Red and the blue and green with Gryph-Charger Grey.