Showing posts with label Vanguard Veterans. Show all posts

Monday, July 10, 2023

Assault Squad Arms!


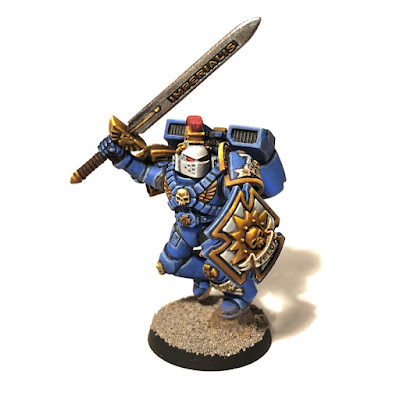
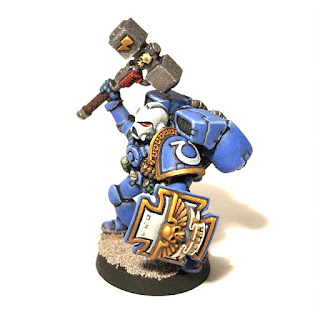
With the release of 10th edition of 40k the Vanguard Veterans got some less than favorable changes.  But, luckily I anticipated the need to be very flexible with their loadouts and magnetized their arms.  While unfortunately the magnets are a bit weak and make them a bit fiddley - I'm able to change them into a basic assault squad with ye ol' humble bolt pistol and chainsword.  The assault squad rules might be someone more favorable, but also makes the squad a bit cheaper which is another benefit now that it is much harder to adjust army lists with how they are doing points right now.

Anyway - its just fun to have chainswords and I was able to create these fairly quickly for the upcoming narrative campaign at the 2023 US Open.


The greenstuff let me down a bit - I was going to hide it with gore, but maybe I'll add that later.  I'm really happy with how the hazard stripes turned out.  This was also the first time really trying to do the chipping effect.  Both the hazard stripes and the iconography were achieved using some stencils that I bought online.  The stencils are intended for use with airbrushes, but that's not something I have access to, so I tried a technique I saw that involved using a sponge to blot on the paint.  They had used the technique on flatter vehicle surfaces with stencils that were much bigger.  Here the technique didn't work so well on the curved shoulder pauldrons - and at first they were a complete disaster.  So much so that I only used the stencil for the Ultramarines icon, I ended up just free-handing the assault squad arrows.


In the end I was able to salvage it since I was intending on them looking chipped, and so after some effort touching them up in spots they turned out passible.  The stencil did much better on the flat sword surface, but also instead of blotting with a sponge, I used a brush and just tried to stay in the lines as close as possible without touching them.  I'll give it another go next project, this was sort of a test run for the Rhinos.  That project is still WIP and I'm making progress which I'll update on soon.

Friday, February 24, 2023

Vanguard Veterans Complete!


Ok, finally done.  Best models yet!  It's true what they say, just keep painting and you get better and better every time.

While I think that the gothic text for Sergeant Nox's was my best ever, the text lettering across all shields and etc. was fairly consistent and still pretty neat.


The face for the (yet unnamed) alternate sergeant's face really turned out great too, very pleased.


The NMM gold also turned out pretty great for a first real dive into that.  I can definitely see spots where it isn't quite right, but I feel that this is one of those skills that will have a lot of room to master.  Mostly it seems like its all about looking at examples and reference images.  There is a guy on instagram that posts really great examples all the time and I think had subconsciously helped me a bit, maybe further conscious effort to look at his work, and others, would be the next step there.


I think the magnetization needs a bit of improvement.  I used smaller magnets (mostly because drilling bigger holes into pewter might not have been possible) and between that less than perfect placement - some of the arms feel a bit weakly attached, or aren't quite joining perfectly.  That's an area to improve next time.  I do think these vets are a bit of a special case with different weapon options, but yeah not exactly sure if it was worth it.


And finally here they are in the pose I've been capturing throughout the process.  Perhaps I'll get around to a gif that steps through the steps again.


Monday, February 20, 2023

Vanguard Vets (WIP) Update 9 - Face Painting

Really close to complete now.  Almost all colors have been shaded and highlighted.  What is left is lettering on the various scrolls, and the face on one of the two alternate sergeants.  Saving the hardest parts for last.


While I have painted a few faces before, looking back they were fine for my skill level at the time, but in the past few years I feel I've really improved a lot.  For this attempt, I was going to follow Darren Latham's technique.  I've used his contrast paint technique for a face before, but this would be the first time with conventional paint.

Starting Point: 4 or so coats of Bugman's Glow

With these zoomed in images, I can tell that I'm still not quite on the high level that I see from other hobbyists/professionals online, but I do see improvement from my own work in the past.  One thing that stands out though is the bumpiness - I think this is the spray primer which continues to disappoint, but when I look at the models in person they look much better.

Basic highlights added

I found Darren's instructions really detailed and easy to follow and I'm really pleased with the results.  Below I have the basic steps and paints for my own reference.  I don't typically work with paints thinned down to washes so much, especially since it tends to pond/pool, but after watching his work and trying this out, I think I've actually made a breakthrough in how to control the watery paint and draw it off if its ponding.

Basic shading added

The model itself has really extremely exaggerated cheekbones, more so than the primaris space marine head that Darren used, so I used deeper shading, but otherwise I mostly followed his instructions (from his youtube video) directly.  Also, this miniature has barred teeth, so I used some Zandri Dust and Screaming Skull and it worked great (I felt white would be too much).  I used white ink for the first time and it is a lot better than white paint.  

Color glazes and final highlights added

The model seems to have one eye open and one eye closed (or the primer obscured the detail), and the open eye seems to have a deep scowl so you can only see the side of the eyeball.  Thus, I decided that, after the step to black out the eye, I just needed to put a dot of white on the side of the eyeball, and use the existing black to create the iris.  Since the narrowed eye and the direction he would be looking would mean you wouldn't see the white on the other side of the iris, it massively simplified the hardest steps of painting the eyes.  I think it turned out great, especially when viewed in person.  With my magnifying glasses, I can tell it still isn't quite perfect, but overall I'm really happy my first time trying this technique out, it worked much, much better than the methods I had pieced together before.

Final details: eyes, teeth, etc added

This time I skipped adding stubble/ 5o'clock shadow.  Either the sculpt has scaring on the left side of the face (in shadow here) or the primer/finish kinda messed up the details, but either way I decided trying to go for the stubble wouldn't turn out.  Maybe next time.  Looking forward to trying this again and using darker shades to vary the skin tone.


Finally, here's the whole troop (just before painting the face):


Friday, January 20, 2023

Vanguard Veterans (WIP) Update 8

Starting to look close to done now.  Completed some major milestones:  Got the first of two layers of edge highlights - the Calgar Blue is done and just have to do the Fenrisian Grey - on all of the power armor.  And two, finished all of the non-metalic metal (NMM) gold on pretty much everything.


I don't think I can give a guide for NMM, and there's tons out there that are really good, but I do want to offer words of encouragement.  Dont feel like you have to do the perfect mirror finish, I've opted for a "brushed" or "sandblased" gold that is more reflective than the matte power armor areas, but isn't mirrored either.  The basic idea is that on non reflective surfaces the gradient from shade to highlight might be somewhat linear, while something semi reflective makes this more exponential - slower to stay shaded and then suddenly pops to a bright highlight.  Then when you get to mirror finish you have to worry about reflections and such which adds a lot more complexity, so by skipping those reflections with a brushed look, or simplified NMM seems like a good starting point.


Kinda hard to tell with the lighting but first everything is flat Mornfang Brown

Next we've glazed in mixes of brown and orange all the way to full on orange in the areas towards the light source

And then it all comes together with Vallejo Golden Yellow on the edges and in very small amounts on surfaces, and Vallejo Flat yellow dot highlights and vertices.


Monday, January 2, 2023

Vanguard Veterans (WIP) Update 7

First set of blue highlights are complete across all areas!  It took 13 hours.  I'm convinced that my technique is the slowest.


I'm now starting in on a basic NMM technique that I've used before on the gold areas.  I think that they have a brushed metal, so I'm not going for full on mirror NMM reflections yet.  The shield on the right is the base brown (such as above as well), and the shield on the left has the first few layers of brown-orange and orange.  There will be a shade (to fix anything that fell into a recess) and then a few more layers of golden yellow and yellow in very limited amounts to complete the effect.  I'm adding glaze medium to help smooth the transitions.


Monday, December 19, 2022

Vanguard Veterans (WIP) Update 6

Progress on the vanguard vets:

Sky Gray on the helms in a few layers.  Also did gray on the lenses and then used Blood Angels Red contrast to color them in.


My planning sheet would have had me start on adding another level to the gold areas (brown-orange) if I were to follow previous patterns.  Instead, I've decided to do the shading and highlighting on all the blue first, then go in to do shading and highlights for all the rest.  The main reason is that once the blue is done I can attach the arms in the intended poses and know what the lighting will look like for the shade and highlights on the arms etc, without worrying too much about swapping them on and off as much.  Since they're magnetized its not too big of a deal, but I'd prefer to not be fiddling with it as much as I can.

Wednesday, December 7, 2022

Vanguard Veterans (WIP) Update 5

Midtone blue base layer (coat 1) done.  There are patches where it is patchy because I still need to apply the second layer that will even it out, but I think I want to shade first so that I can also glaze a nice transition in the shadowy areas.


Thursday, December 1, 2022

Vanguard Veterans (WIP) Update 4

Basecoats are blocked in for most colors, and just starting on the 2nd level layer of blue.


Tuesday, November 22, 2022

Vanguard Veterans (WIP) Update 3

Vanguard Vets are magnetized and primed and painting is in progress!

The base coat priming didn't go on exactly as I'd like.  It's such an important step and it seems like there is a lot in the hands of the humidity and temperature gods.  I think this time I sprayed when it was too dry and windy and a bit too far away so there is a very minor fuzz in a few patches.  

Some of the tricks online are to use glass wine bottles with the miniature tacked to the cap.  This provides a heavy, stable base that wont get blown around in the wind and allows you to hold the miniature so you can get a good angle on the underside and also spin to get 360.  The video I watched also seemed to have them spray closer than I have been which might help with the spray drying too much before contact.


Thursday, October 20, 2022

Another Dive into Green Stuff: Seams and Such

I have moved on from sculpting rocks.  The original reason for the dive into green stuff was to be able to mount the space marine jump packs with enough of a gap to allow for the shoulder pauldrons to fit when the character is lifting the weapon up. I found that to support the raised arms, the jump packs had to be tilted back a bit and there wouldn't be enough surface contact to create a strong bond.  This is exactly what green stuff is supposed to fix.

I also wanted to learn how to use the stuff for smaller seams as well, such as the gaps between the two halves of the torso for the veteran sergeant, and the two halves of 2 plastic jump packs.


I think I did a pretty good job with the interface between the jump pack and torso for the veteran sergeant.  I even added some texture to simulate connection cables/joints.  I didn't get pictures of the metal miniatures but there I just went a bit more basic and kinda just extended the block from the back of the torso.

Using the sculpting tools I feel I was able to get the green stuff into the recesses and flattened and smoothed on the various surfaces of the jet pack pretty well.  

On the torso, which was actually the first thing I tried, I think the visible areas were pretty good, but I could have done a bit better job around the gorget.  Luckily, with the head in place, all of this area should be well hidden.


Finally, to add a bit more 'bling' to the sergeant, I used another bit from the Ultramarines upgrade sprue and attached an ultima to the jump pack.  I think they intend for it to mount on top like the final on a flag, but I prefer to avoid things like that where possible (already enough things that can break off) so instead I wanted to mount it flush.

Thursday, October 13, 2022

Next Dive into Green Stuff: Tactical Rocks

Using green stuff for fixing gaps and such was a fairly easy way to get started and learn how to work with it.  Next I used it for creating 'tactical rocks.'  This required a bit more skill in sculping rocks, but since rocks are usually blobs, it didn't take much skill.  Obviously real rocks of different types have different properties - river rocks are generally smooth, shale or similar sedimentary rock are rough and have 'fissile' characteristics (splitting flat), and so on.  So I didn't achieve any particular uniform rock-like characteristics - I just made blobs, but I think with some mud, paint, and ballast I can make them a bit more rock like.


This tactical rock didn't quite get centered under the foot, but I felt it was all right since maybe sometimes these transhumans have more things to worry about on the battlefield than posting with the foot squarely on the rock, you know, gotta make sure that hammer is just so for the warcry.  Pretty much all of the other minis in this squad needed a similar rock and got most of those centered, so this guy has character, maybe he's earned the name 'Shifty' or something.


Here we had some extra so I made some tactical mud to go with the tactical rock, which is of course hiding the bit of pewter supporting the foot and connecting it to the base slot tab.  I think this rock looks fine and its got a split in the front.  Using the silicone sculpting tools I was able to add texture and think it looked good enough. The 'mud' will probably get covered by paint-mud or ballast, but at least it will add a bit of dimension.