Thursday, April 21, 2022

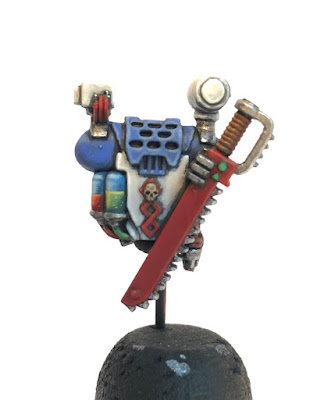
Chief Apothecary Hulm Singa Complete!

 Chief Apothecary Hulm Singa:

It is a 1991 miniature (catalogue #070133/63) but as with my techmarine, I decided to go with a 2nd edition backpack to give him the iconic Apothecary silhouette (lamps etc).  For a long time GW published lists that gave bolters to Apothecaries as an option to support these miniatures.  At some point though they gave up and now only pistols and chainswords are on the wargear list.  So, because wysiwyg is important to me, I stuck a chainsword on the backpack too.  The pistol was already holstered on the sculpt.

White is tricky, but I feel I did alright with it.  I experimented with a little contrast in some areas like the shoulder insignias and studs.

Also I am fairly pleased with how the vials/IVs on the backpack turned out as posted before.  To finalize the glass look I put 'ard coat on them and it really made the difference.  Looking at the pictures now though I might go back and apply a bit more shading to the IV lines and some 'ard coat on them too.

Pinning the backpack was quite a pain, even though it is plastic (while the miniature is probably lead, or maybe pewter) the join tab didn't line up very well, and the older sculpts really had weird designs anyway.  Figuring out where exactly the backpack wanted to sit most securely and then figure out where the pin holes should go took almost +++redacted+++ [an embarrassing amount of time].  But now that it's on I feel like it's fairly well connected.  I mean obviously it still has a bunch of fiddly bits with the camera, lamp, and chainsword, but its on there.


Yay friends:


Wednesday, April 20, 2022

Master of the Forge Samus Dexter is Complete!

 Behold: Master of the Forge Samus Dexter!

Frater Dexter is truly a classic Rogue Trader - the model appears in the 1989 Catalogue as #410506.  However, model came with a standard plastic backpack which I decided to 'upgrade' to a slightly more modern 2nd edition metal techmarine backpack that features the servo-arm.  I felt this would better give wysiwyg options and the standard techmarine silhouette on the battlefield.  And the name is of course from WD97.  

I finally got that heavy pewter backpack pinned on the other week after a slightly harrowing drive over the mountains to visit my folks where I was able to get to the tools to do the job.  Pinning didn't quite go as planned, but it seems sturdy enough.  I then applied the basing (classic style to match the rest of the army) and then finished with dullcote, some metallic highlights that got dulled, and 'ard coat on the lenses.

I'm quite pleased with how the radar unit turned out, and the helm visor.  I must admit that I was a bit lost on these details originally.  Luckily I ran into the same #410506 miniature on instagram by stonecoldleadfigurepainting who had done an excellent job and so I applied the same ideas.

Whenever I get a chance to play a game the toolbox allows for me to suggest he has any number of wargear in the box, I love it.  I think the metallic green turned out really great.  It was gunmetal washed with contrast.  My dad has some toolboxes in approximately that color that inspired it.  Also, the drill!  Techmarines unfortunately don't have any drill wargear, but I'm sure I can create a custom weapon with the same stat line as an existing melee weapon they have for rule of cool factor.

I was really happy with how the Ultramarines sigil turned out on the backpack.  The classic techmarines had the weird demon hand on the shoulder which did not lend itself to displaying any chapter markings easily, so I just painted it chapter colors.  The bolt on the servo-arm was perfectly positioned behind it.  I would imagine that the sigil spins as the arm moves, but it would be upright when the arm is in the stowed position.


Wednesday, April 13, 2022

Stripping Paint the 'Easy Way'

Stay tuned for updates on Appy & Techie... they're nearly done and just looking for a warm day to seal and complete final touches.

So, in the background, I have moved onto the next project.  For the next project I have a number of metal models that I inherited.  Some of them were in various incomplete stages of painting, or had old primer.  At first I considered preserving the paint, but after looking closer I decided there were too many problems.  I wasn't exactly looking forward to the alternative - stripping the paint off, but it became clear that there was no other option - the paint jobs were not in good condition and were not at the level I wanted.

I looked for advice from the helpful 40k reddit folks and it seemed acetone was the way to go.  The basic advice was to soak the miniature in acetone for 5 minutes, then scrub with a soft toothbrush, and then finally rinse with warm water.

Here's the after and before:


I think it worked really well.  The adventure was a learning experience: I found a few tricks that made things even easier.

To start with I got some acetone and in the same trip out to my dad's workshop to drill some holes for pins and magnets, I also got out the sonic cleaner and dumped them in.


The first problem was that working with acetone isn't fun.  You want to be outside because of the fumes.  Also, it can really irritate your hands.  So here's what I found:

1. Latex/Non-latex gloves don't work, the acetone melted straight through almost immediately.  Instead we had some heavy PVC type gloves that worked, but it limited dexterity.  These gloves also helped with another problem - the rapid evaporation will suck the heat straight out of your fingers very quick, and so if you're outside in early spring it hurts a lot.

2. Dunking the toothbrush into the acetone and then immediately scrubbing is SUPER effective.  Just scrubbing after taking the miniature out of the tank, or applying acetone to the miniature wasn't nearly as effective and would require a lot more effort.  But by either dunking the brush, or using an eyedropper to wet the brush and then scrubbing immediately would pull the paint and primer off after just a few seconds of vigorous scrubbing.

3. I also held the miniature in a paper towel so that it would absorb the acetone particles/spray from the brushing and trap a lot of it from going everywhere.  It was also a good way to see how effective the brushing was.  By using the brush dunk technique the paper towel would immediately turn very dark gray/blue, while when not using the technique a clean towel would slowly turn light gray at a much slower rate.


(The other picture kinda looked like I just changed it to black and white, so with this one I wanted to get my hand in there to prove it heh)

Monday, March 14, 2022

Proto Grey Knight Complete!

 First model completed for 2022!  It snuck in while waiting to pin the Apothecary and Techmarine.

In the theme of trying new things with this tester model, I experimented with modern basing techniques.  While I really like the plain gray ballast on the Ultramarines (I think it makes them pop), I wanted different basing to distinguish the Grey Knights as another army, learn something new, and contrast from the silver/gray of their armor.

I went with what seems to be a standard entry level scheme of mud and grass tufts that I see commonly.  After watching a few tutorials on various ways to do it, I felt I could pull it off with most of the things I already had on hand, but I did need to pick up the grass tufts and I tried out some Citadel Stirland Mud.

I started with applying the mud and then sprinkled some of the brown irregular ballast that I have (which by itself looks like bark).  Some of the tutorials showed using coarse, medium, and fine ballast which probably gives a better overall look, but I only have fine irregular brown and fine gray gravel types.  I think in the future I might get some coarse stuff.

The mud dried with the ballast embedded - and while that was probably durable enough, I wanted to give it a extra coat of pva glue to be sure.  Actually, before applying the glue, the Stirland Mud color with the slightly brighter brown ballast looked pretty good from medium and far, but I wanted to try more techniques, and also glue it down.  With the water + glue mix it definitely needed to be painted as it had a weird sheen.

I then used Morunfang, then Agrax Earthshade, then a drybrushes of Mournfang, Zandri Dust + Morunfang mix, and then Screaming Skull + the previous mix.  Then I glued in the grass, gave it a bit of Seraphim Sepia at its base, and then another drybrush of Screaming skull to the tips of the grass.

Finally, I also tried out some new Vallejo Pigments to apply dust/mud to the boots.  I've seen this used to tie in the model to the base.  I used just plain water to fix a mix of mostly Burnt Umber and a tiny amount of Light Sienna and applied it wet.  When it dried it looked a bit more caked than I was going for, I need to figure out how to make it look like a dusting, but still it looks fine.  I intend to use the Light Sienna with the gray gravel bases for the last few Ultramarines for that army, but will definitely want it light as they have to be very dapper.

Overall I think the model was very successful as a study in multiple new techniques and it will be fun to finish the other four models.


Sunday, February 27, 2022

Bonus: Grey Knight WIP

Before I can finish up the Techmarine and Apothecary, I need drive out to visit my dad to use the Foredom to drill out the holes to pin them together (not going to repeat drilling into pewter again if I don't have to!)

So, in the meantime, I've had this sitting on the desk and I figured I'd try out a few new techniques!

First was to use a stippling technique with a blunt Artis Opus dry brush that I saw in a video about 'grim dark' Ultramarine paint styles by Richard Gray.  I applied it here to give a texture to the bronze base coat.  In general I was following a scheme from a "Vertisee Models" video for a weathered Grey Knight.

I found I had to use a wash of Snake Bite Leather Contrast over the bronze to get the real dark effect I was looking for, then a dry brush of Leadbelcher and then silver highlights for the edges and scratches.  Overall it achieved the effect I wanted - armor that looked ancient - like a very weathered coin.

I will say that I can see why people go for NMM (non-metal metallics) because working with metallic paint isn't great.  Namely, its hard to get it to look really crisp with sharp lines.  I feel like in the pictures exaggerate the problem though because in person it does look a bit better.

For the Nemesis Force Sword, I found a lot of videos to work magic with air brushes - but not really useful for me.  I found Juan Hidalgo's video and it was what I was going for.  This is the second time I had used one of his videos, I followed his technique for the plasma pistol OSL as well.  It was very approachable and turned out pretty well!

I didn't have any of the colors he used, so I substituted in Vallejo Deep Sky Blue for the base, then a mix of Deep Sky Blue + Skarsnik Green + White glazes in various concentrations for the shine, and blue ink for the shade in the other direction.  Then the black and white per his video.  It really worked out - this was the first try, so imagine after some practice!

Anyway, the whole thing so far came together in just 9 hours of paint time which is about 3/4ths as much time as I spent recently on the other models (per model).

Really all that is left is the base and then some varnish.  This prototype scheme will probably be what I use for the rest of my Rogue Trader era Grey Knight 5 man squad, though I might get the remaining colors for the sword so that I don't have to mix them (hopefully it is close enough).


Monday, February 21, 2022

Appy 'n Teckie (WIP) Update 4

All of the detail is done!  And I've applied a base coat of brush on varnish.  I think I will do that from now on (at least for important models) to add extra protection.  I've read that Testors Dullcoat spray doesn't protect very well.  I'll still use it for the finish, but I think the extra varnish under might be a good idea.

I still need to pin the backpacks on, finish the bases, and spray on the dullcoat.  And then also apply the final metallic highlights.


I finished the liquid vials on the backpack - the last step was to apply the blue colors for the upper part of the glass.  I think overall it was a success.


I just found some old references to post heresy Ultramarine Chief Apothecary and Master of the Forge names in an old White Dwarf (WD97).  Guess who now has names?


While I like using my own names for my models, and would never use 'Named' Character datasheets (well maybe someday I might get a Robby G...) but I will use a 'known' name that isn't attached to a datasheet, especially if its a really obscure and retro reference!  

But some of those names though, oh man, Christopher Columbus (basically) - right up there with Inquisitor Obiwan Sherlock Clousseau ;)

Friday, February 11, 2022

Appy 'n Teckie (WIP) Update 3

 Making more progress, and I've also been learning some new things!

First, I found a glazing tutorial by Dana Howl (aka @dana_howl) were I learned something useful that I hadn't heard before.  The main new thing was to wet a towel and unload 'most' of the glaze/paint from the brush before going in to paint.  'Most' still takes practice and experience, but the goal is to prevent flooding the area on the miniature.  This small bit of information which I had never heard before was huge!  It was the missing piece that I didn't know I didn't know.  I had always struggled with paint pooling/ponding and then creating marks at the edges of the pool if it dried even a little as I was trying to move it around.  I always thought it was a consistency problem or something and this finally gave me the answer!

She recommended using glaze medium rather than water which I had heard before, but I tried it again, and with the above information it was helpful in differentiating more for me in my mind the difference between a wash and a glaze.

Anyway, with that, I have made progress on several areas which directly benefitted from this new information and gave really good results.  For example, the Techmarine's helm lens/visor looks really good after applying some blended glazes from green to a slight lemon lime blend with yellow.

And of course, I started in on the green liquid in the Apothecary's backpack.  I'm following Louise Sugden's (aka @Savage_ork_guy) Citadel Colour Master Class Glass Bottles technique which was a huge help and so far it's turning out great.